NESTBOX PLANS
Building nest boxes is a fun, relaxing activity that can also save you money. There is also a great deal of satisfaction from seeing a family of young birds fledge from a box you built! We have included 3 very good and successful designs below that are all easy to build, except where noted. These all use exclusively right angle (90 degree) cuts and can be built with basic tools. However, it is much easier if you have a power drill and some sort of power saw. Each PDF downloadable design has complete dimensions and a material list.
All the design plans and nest box photos are provided with the kind permission of Fred Stille Sr. You can visit his website www.nestboxbuilder.com for many more good bluebird house designs.
Click each box design title below to download the PDF file with a building plan. NOTE: You must have Adobe Acrobat installed on your computer to open these files. If you don't have it, go to Adobe's site for the free download.
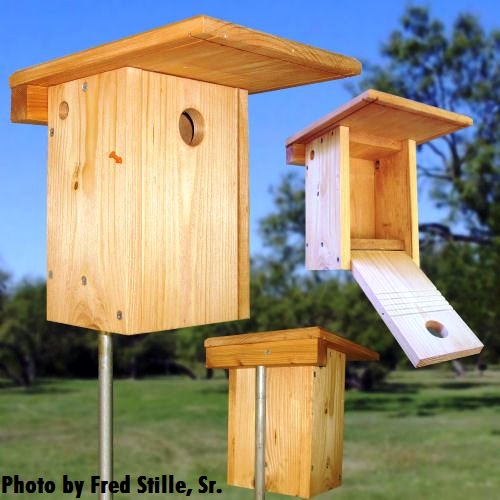
 This is a highly successful design from Steve Gilbertson of Minnesota that has been shown to be loved by Bluebirds, but not as preferred by House Sparrows as more traditional nest box designs. The unusual, open-top entrance hole and relatively shallow depth are not as liked by sparrows as more deeper designs with regular round entrance holes. With this design, the entrance hole is more difficult to make and will require you to have some sort of 2 ¼” diameter hole saw. The box uses the Gilbertson conduit/rebar mounting system.
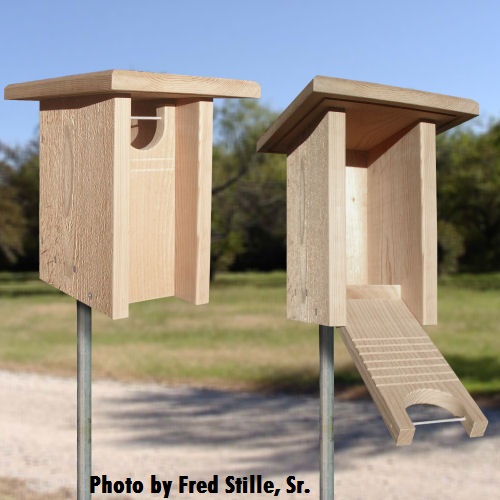
Design by Steve Gilbertson. This is one of the very simplest bluebird nest box designs you can build. There is no entrance hole to drill due to the open top slot entrance. The open entrance and shallow design make it less attractive to House Sparrows. Also, this slot entrance is safer for bluebirds as it allows them to more easily escape from the box if a sparrow enters it while the bluebird is inside. The box also incorporates a double thickness roof which helps provide better heat retention and insulation from summer sun. When building the box, it is important to make sure that the slot entrance is at least 1 3/16” high. So, install the door as one of the last steps and trim it down if necessary. Also, the material list calls for using all 1” by 8” cedar. But, if you don’t have a table saw, it is probably easier to use some 1 x 4 stock instead.
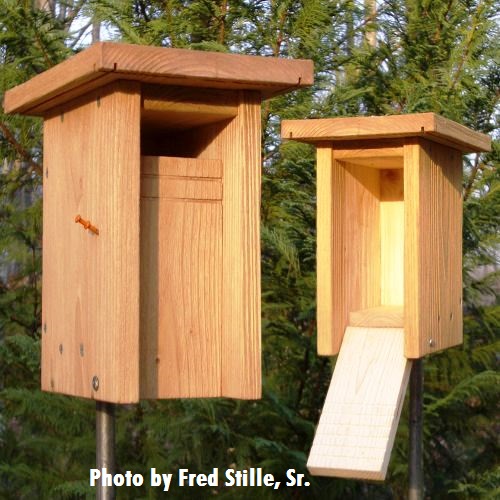
 This is a great, simple nesting box design developed by Tom Comfort of Antrim County and a committee of national bluebird house experts. Early testing results show the bluebirds really prefer it over many other designs. It features a 1 9/16" hole, slightly larger than the traditional 1 1/2" hole size. It is designed to be mounted using 1/2" electrical conduit and rebar. See below for details. It is easy to build and can be constructed with either cedar or pine. However, cedar will be more expensive and it may be hard to find wide enough lumber for the roof at your local building store.
For more information about the Xbox, read this article from our newsletter.
Here are some basic general tips on constructing nestboxes for bluebirds and other cavity nesting birds:
- Use 3/4" thick wood. It holds up better and provides better insulation ability on cold nights.
- Cedar is the best exterior wood to use, but can be expensive. Pine is OK though too. Cypress is also a good wood to use, but is not available everywhere.
- Providing holes or gaps near the top of the box for ventilation and cooling can be a good idea, especially if the box is located in a hot climate area..
- On the inside front of the nest box, provide some sort of ladder for young birds to climb up and out of the box. You can put saw grooves in the wood (about 1/4" to 3/8" apart) or affix some hardware cloth.
- Wood screws are better than nails in general, because they hold the wood together better over time. If you do use nails, the ring-shank type is best. Also, use either stainless steel (expensive) or galvanized.
- ALWAYS build nest boxes that can be opened up for monitoring and for cleanout at the end of the nesting cycle or season. Follow the direction on the included plans.
- Do NOT stain or paint the interior of the nest box. You can stain/paint the exterior, but always use non-toxic water based products.
- If possible, ALWAYS provide a large overhanging roof that provides a lot of shelter on the front and sides of the box.
- The diameter of the entrance hole can be either 1 1/2" or 1 9/16". The latter makes it a little easier to enter and is best for the slightly larger bluebird species out west Also, make sure the hole is smooth without burrs and splinters sticking out
How To Mount Your Nest Box
The Gilbertson Pole Mounting System
Steve Gilbertson of Minnesota has developed a very simple, effective, and inexpensive mounting system that works for most light to medium weight nest boxes. One great part of this system is it provides an easy solution to the problem of how to support a nest box in the ground and keep it stable and straight. The main components of the system are a 5 foot long section of ½” electrical conduit and a 48” long piece of ½” diameter reinforcing bar (or rebar for short). These can easily be purchased at most home centers for a few dollars. The other hardware needed is a ½” EMT coupling with one ¾” screw to replace the shorter one at the bottom and possibly one or two ½” conduit straps to secure the top of the hole to the house.
Once a suitable location is found for the box, the 48” rebar is pounded into the ground with a mallet to about an 18” or 24” depth. Care should be taken to ensure the rebar is 90 degrees to the ground. Then, the 5’ conduit is slid over the top of the rebar exposed above the ground with the ½” coupling on the bottom near the ground. The screws in the coupling are then tightened to the conduit and rebar to prevent turning relative to each other. Finally, the nest box can be mounted to the top of the pole using whatever method is suitable for the particular nest box design. See below for more details. Also, you can download a diagram showing the Gilbertson Mounting system here . (NOTE: You must have Adobe Acrobat Reader installed on your computer to open this PDF file.)
There are a number of ways to secure your nest box to the pole. The 3 configurations below are easy to create and will work with almost all bluebird houses:
 Commercial mounting flanges – there are a variety of nesting box mounting flanges that you can buy at birdfeeding stores or online. Usually, they are made to fit certain manufactured pole size, but sometimes are flexible to different pole diameters. The picture shows one type that has a plate with 4 holes for wood screws to secure the box to the flange/pole. Usually, ¾” #8 woodscrews work, and can be made out of galvanized or stainless steel. Note: most flanges of these types mount to the back of the box. However, some flanges can be bought that will attach to the floor of box. In this case, you need to make sure the installed house/pole is not too tall to allow easy monitoring inside the box.
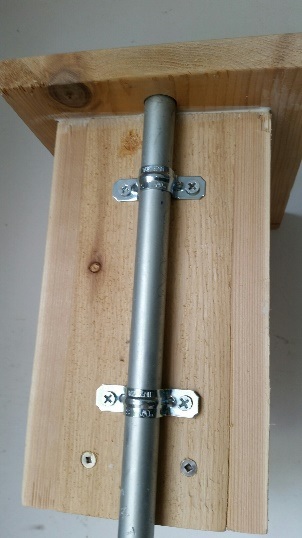
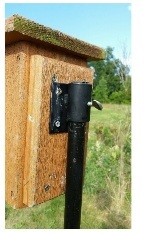
Extended Roof Mounting – this is a very simple and inexpensive mounting system that will work for most round metal poles of different diameters. It is far easier though in nest box designs that use flat roofs (like the 3 designs shown above. In this method, the roof of the house is made to extend outward from the back wall enough so that a round hole matching the pole diameter is drilled (countersunk) into the roof to about ½ the thickness of the roof. (See the photo) It is easiest to do this using a Forstner bit that creates a flat bottom hole. The top of the mounting pole then fits snugly into this hole supporting the box. Then, 2 piping straps are used to further secure the pole to the box as shown and installed with small wood screws. If you’re using ½” EMT electrical conduit, use the ½” straps and it will keep the house very tight to the pole and prevent turning in the wind.
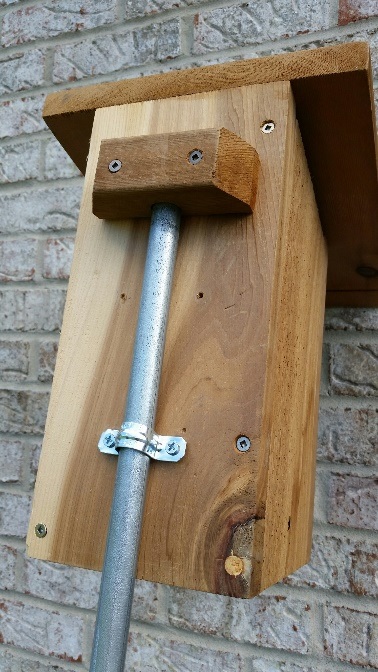 Mounting Blocks – using this method, instead of having the top of the pole go into a countersunk hole in the roof, a wooden block is attached to the back of the box for the pole to go into. (See photo) The block can be made easily out of a small 2 by 2 section of wood and screwed to the back of the nest box with 2” coated deck screws or stainless steel screws. The block doesn’t need to be more than 3” long and should be installed in the upper 1/3 of the house back wall. Before doing this, you will need to bore a hole into the mounting block about ¾” deep, and as close to the edge next to the house back as you can. This will enable the pole to be close to flush with the back wall of the box as possible. Then, just use a piping strap to secure the lower part of the pole to the box as shown.
NOTE: If after mounting the box using one of these methods and the house still turns pretty easily in the wind, you can prevent this by either wrapping the top of the pole with a little tape for a snugger fit, tighten some of the strap screws, or find some straps that more closely fit the pole diameter.